The import and export feature has always been one of the standard functions in Odoo. This results in numerous application possibilities for us for various use cases. In today's blog, we'll go into how the import and export feature helps us in Odoo and how we use both features.
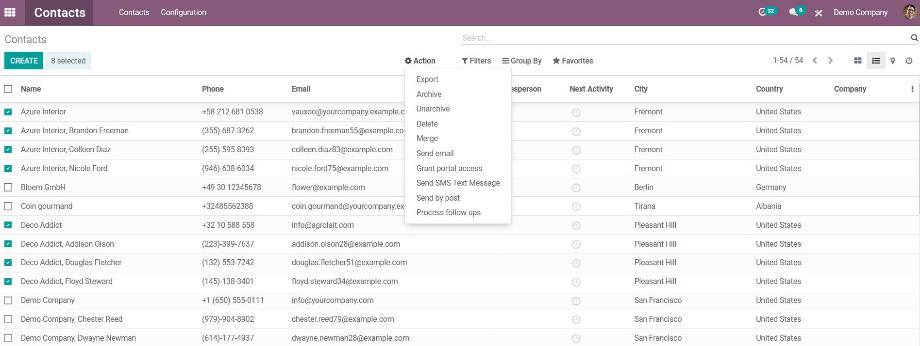
Let's start with Export, which is great for exporting our data from Odoo in addition to the spreadsheet feature. This gives us the possibility to analyze our data using other tools or to process it in other ways. The export is available to us in all modules or objects. To export the data from Odoo, we simply switch to the list view of the respective object. Then we select the data sets for which we want to export data. Via Action → Export we reach a pop-up in which we specify our export.

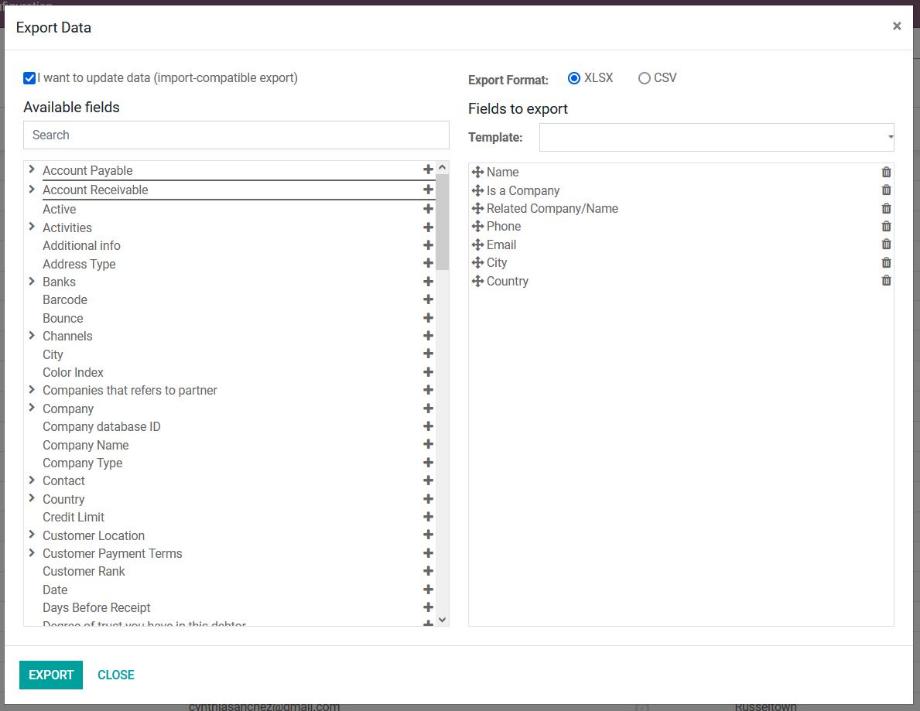
In the pop-up we first define whether we want to select from all available fields in the corresponding record or only export data that can be imported again later. A search field helps us to select the right fields for export. Alternatively, we scroll through the list (left side) and select the fields for export there. Underlined fields can be expanded via the arrow icon, for this purpose further sub-fields are available. By double-clicking on a field or clicking on the plus icon we add the fields to our selection (right side).
Furthermore we select the file format for the export. We can choose between Excel (.xlsx) or CSV (.csv). In the list of fields to be exported, we adjust the arrangement of the fields using the arrow icons by dragging and dropping the fields up or down. The arrangement in this list also corresponds to the order of the columns in the export file. With the trash can icon we can remove fields from the list. Last but not least, we have the option to save the list to be exported as a template, in order to select it again later for another export. With a click on the "Export" button, Odoo generates the export file.

In the export file, we now find all the data that we have selected for export. We notice that the table header and the names of the individual columns consist of the technical field names in Odoo. The advantage of these designations for the import will be explained later on. The data in the export file can now be adapted, evaluated or processed in any other way.

With regard to data export, Odoo offers us another helpful feature. In all list views, there is a small download icon next to the "Create" button. By clicking on this icon, we have the option to export exactly the displayed list view with the corresponding data.
We can customize the table header using the icon with the three dots and select only the required columns. To display the relevant data from the data fields we use the filter function. With the help of this method, we have a less complex and quick option for exporting data from Odoo.

Importing data into Odoo is very suitable for importing new data or updating existing data. Especially in the context of Odoo implementation projects, in which data is usually taken over from a legacy system, the import represents an important functionality. Analogous to the export, data can also be imported at this point in almost all modules or objects.
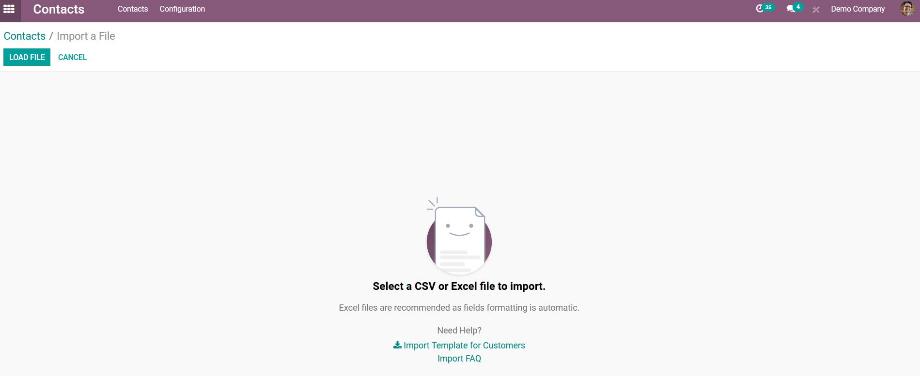
To import data into Odoo, we first navigate to the corresponding module/object. Up to Odoo version 13, there is an "Import" button next to the "Create" button. As of Odoo version 14, the import button is located under the favorites. This takes us to the import interface. The basis for the import is the import file, which should also be created as Excel (.xlsx) or CSV (.csv). For the structure, especially the table header, we recommend using an import template. This contains the technical field names already mentioned above, which Odoo uses to assign the correct fields during import.
In some objects, such as the contacts, the products or the prospects and sales opportunities, Odoo offers us the possibility to download an import template. Alternatively, we use the export as described above and generate an import template.

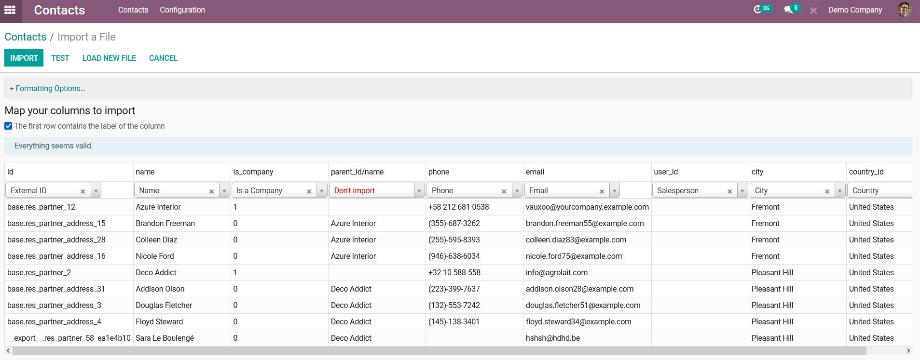
Within the import template or import file, we now add all the data that we want to import into Odoo. We then navigate to the import interface and upload the import file to Odoo. In addition to various formatting options, such as separator of a CSV file, separator for decimal numbers or date format, Odoo shows us the table header including the first ten rows as a preview of our data.
In case Odoo could not assign the correct data fields via the technical field labels, we select the data field manually from a list of all available fields. Alternatively, we can mark a column as not to be imported.
Now, before we finally import our data, we recommend performing a test import using the "Test" button. If the import file still contains errors or the data of the import file cannot be assigned cleanly, we receive an error message with the information in which row which error has arisen. For this case, we revise the import file according to the information and upload the import file to Odoo again. If the test import is successful, we receive a confirmation from Odoo.

After successfully performing the test import, we click on the "Import" button to finally import our data. Odoo then shows us in a small pop-up that x data sets have been successfully imported and we automatically return to the overview of the objects for which we have imported the data.
In summary, we can say that Odoo offers us a great feature with the import and export to get our data into Odoo or out of Odoo. This does not require any special technical know-how, but only a cleanly prepared import file, especially for the import. With the possibility of creating import templates, Odoo also supports us very well in this. With the test import, we ensure that the final import is also carried out successfully.
Due to the large number of possible modules and objects into which we can import data, or from which we can export data, it is difficult to give further general advice. However, Odoo also supports us here, for example with its hints when performing a test import.
ou want to import or export data to/from Odoo, need support in creating an import template or have general questions about importing/exporting in Odoo? No problem! Contact us now and we will be at your side as an experienced Odoo partner!
Sources: www.odoo.com