Das Rechtemanagement in Odoo ist ein umfassendes und komplexes Thema. In diesem Artikel möchten wir einen kurzen Einblick dazu geben, wie in Odoo Rechte und Berechtigungen für User und Daten vergeben werden und wie du diese optimal anpassen, einrichten und konfigurieren kannst, um die Sicherheit deines Unternehmens und deiner Daten zu gewährleisten.
Benutzertypen in Odoo
Grundlegend unterscheidet Odoo drei Benutzertypen:
1. Portal
2. Öffentlich
3. Interne Benutzer
Dies ist die erste Stufe innerhalb der Datenbank, auf der entschieden wird, welche Daten ein Nutzer sehen kann und worauf er Zugriff hat.
Portal- und Öffentliche Benutzer
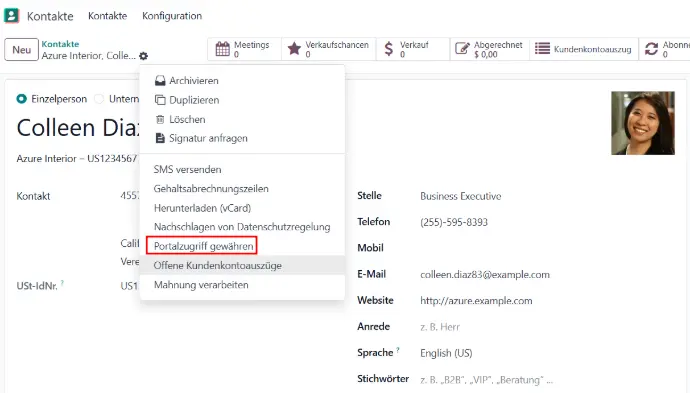
Sie gehören nicht den gewöhnlichen Odoogruppen an, haben aber Zugriffsrechte auf bestimmte Daten und Menüs. So kann jederzeit im Kontaktmodul einem Kunden Portalzugriff gewährt werden, dass dieser zum Beispiel Zugang zu seinen Aufträgen oder von ihm erstellten Tickets hat.
Interne Benutzer
Das sind alle Mitarbeiter, die direkten Zugang zur Datenbank haben, um ihre täglichen Aufgaben erfüllen zu können. Um Mitarbeitern diesen Zugang zu gewähren, müssen diese als Benutzer angelegt werden.
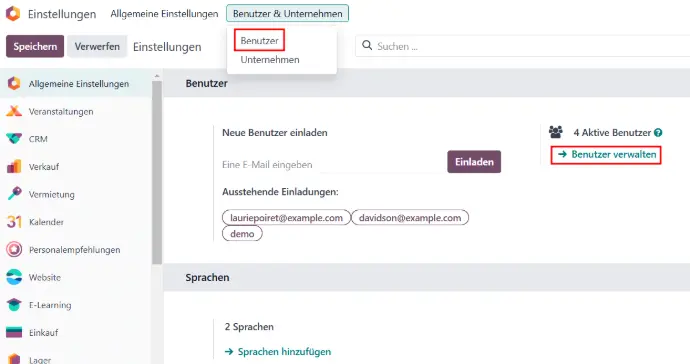
Administratoren können dies in den Einstellungen vornehmen über: “Benutzer verwalten” oder über das Menü Benutzer und Unternehmen → Benutzer. Nach Eingabe des Namens und der E-Mail-Adresse werden die grundlegenden Einstellungen und Zugangsberechtigungen vorgenommen.
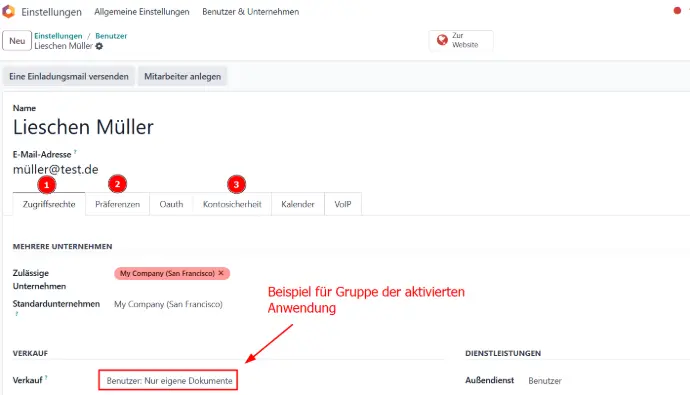
Als erstes werden im Reiter Zugriffsrechte alle für den Benutzer geltenden Zugriffsrechte eingestellt. In Multicompany-Umgebungen werden zunächst die zugelassenen Unternehmen für den Benutzer definiert. Danach sind alle in der Datenbank aktivierten Apps aufgeführt. Der Benutzer wird hier anhand seiner Rolle im Unternehmen in sogenannten Gruppen in den jeweiligen Anwendungen hinzugefügt.
Zu beachten ist, dass standardmäßig alle neu angelegten Benutzer in allen Apps administrative Rollen haben, daher ist hier die Einstellung der Zugriffsberechtigungen (1.) besonders wichtig.
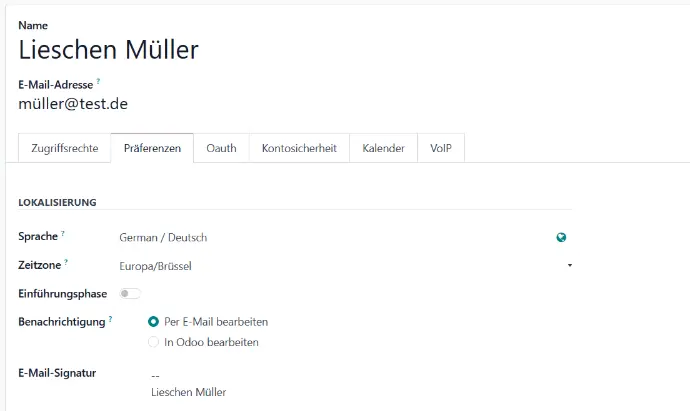
Des Weiteren können im Reiter Präferenzen (2.) die Nutzersprache, die Zeitzone sowie die Benachrichtigungen und die E-Mail-Signatur eingestellt werden. Im Reiter Kontosicherheit (3.) kann der Administrator der Datenbank ebenfalls entscheiden, ob sich der User per Zwei-Faktor authentifizieren muss.
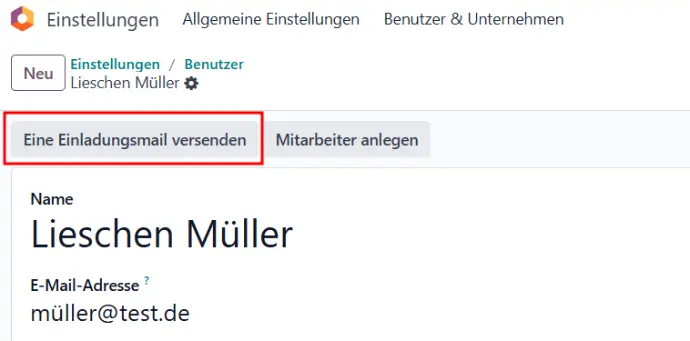
Ist das System über einen E-Mail-Server angeschlossen, kann der Benutzer über den Button “Sende eine Einladungsemail” informiert werden, dass er sich im Odoo registrieren kann.
Gruppen in Odoo
Odoo hat für jede App bereits vordefinierte Benutzerrollen, welche sich anhand ihrer Zugriffsberechtigung auf Daten und Ansichten unterscheiden.
Grundlegend ist dabei folgendes geregelt: Soll ein Benutzer keinen Zugang zu einer bestimmten App erhalten, so wird diese in der Zuordnung der Apps freigelassen. Darauf aufbauend erhalten Benutzer einer App Zugriff auf diese, mit eingeschränkten Funktionen. Administratoren hingegen haben den vollen Funktionsumfang der Anwendung zur Verfügung und können ebenfalls Einstellungen und Konfigurationen vornehmen. Bei bestimmten Apps gibt es Zwischenstufen, bei denen die Rechtevergabe detaillierter strukturiert ist.
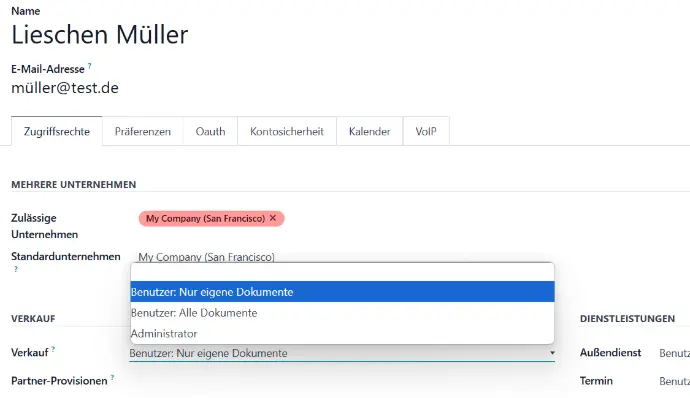
Zu beachten ist, dass jede höhere Benutzergruppe alle Zugriffsrechte der darunter liegenden hat. Hier ein Beispiel:
In der Verkaufsapp wird unterschieden in
1. User: Nur eigene Dokumente
2. User: Alle Dokumente
3. Administrator
Hat Lieschen Müller den Zugang zur 1. Gruppe, so hat sie nur Zugriff auf ihre eigenen erstellten Angebote und Verkaufsaufträge.

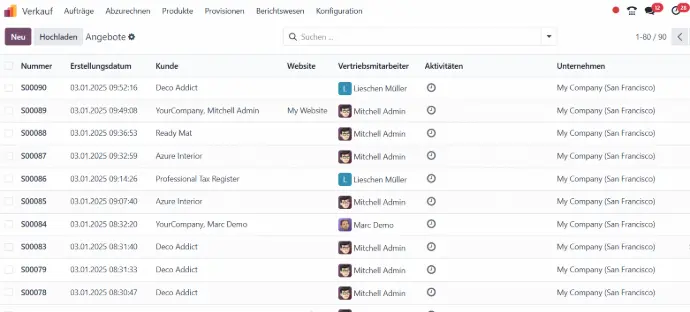
Erhält Lieschen Müller den Zugriff auf alle Dokumente (Gruppe 2), so kann sie ebenfalls die Angebote und Aufträge der anderen Mitarbeiter sehen.
Ist Lieschen Müller Administratorin des Verkaufs, so hat sie zusätzlich Zugang zu den Einstellungen sowie zum Berichtswesen.

Die Übersicht über die Gruppen der jeweiligen Anwendungen, sowie die darin definierten Rechte können in den Einstellungen eingesehen werden.
Gruppen und deren Konfiguration
Wie oben angeführt, definiert Odoo die Benutzerrechte über Gruppen. Das heißt, hier kannst du ganz einfach deine Mitarbeiter anhand ihrer Rollen und Aufgaben im Unternehmen verwalten und ihnen so Zugriffe gewähren, aber ebenso verwehren.
Die Gruppen findest du im aktivierten Entwicklermodus in den Einstellungen → Benutzer und Unternehmen.

Hier können ebenfalls neue Gruppen mit den entsprechenden Konfigurationen hinzugefügt werden.
Die Gruppen sind dabei nach folgendem Schema aufgebaut:
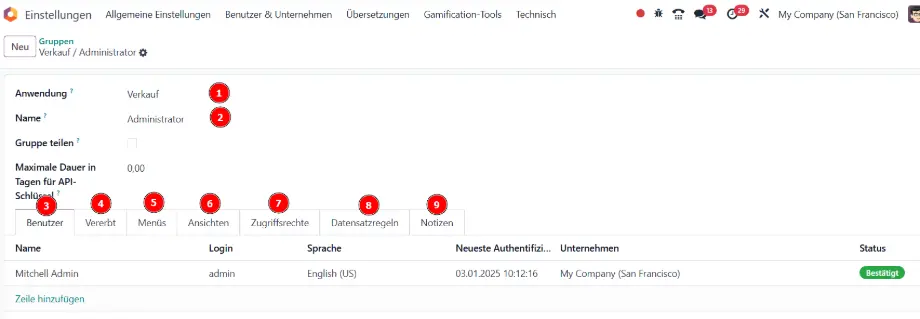
1. Anwendung auf welche die Gruppe zugreift:
Hier wird eingestellt, auf welche App diese Gruppe definiert wird. Wird dies frei gelassen, so kann ebenfalls eine allgemeine, zu definierende Gruppe erstellt werden.
2. Der Name der Gruppe:
Jeder Gruppe kann hier ein eindeutiger, übersetzbarer Name gegeben werden.
3. Benutzer:
In dieser Registergruppe werden alle Benutzer hinzugefügt, welche für diese Rolle im Unternehmen vorgesehen sind.
4. Vererbt:
Benutzer in dieser Gruppe erben automatisch auch die Zugehörigkeit der hier hinterlegten Gruppen.
Dabei ist es wichtig zu wissen, dass wenn Benutzer in den Einstellungen einer Anwendung hinzugefügt werden, diese durch die Gruppendefinition der Vererbung unter Umständen auch anderen Gruppen hinzugefügt werden. Hier begründet sich auch das oben erwähnte Beispiel, dass Lieschen Müller als Administratorin im Verkauf, automatisch auch Mitglied der Gruppe “User: Alle Dokumente” und damit automatisch auch Mitglied der Gruppe “User: Nur eigene Dokumente” ist und damit alle Rechte aus den darunter liegenden Gruppen erhält.
5. Menüs:
Hier wird definiert, auf welche Menüs die Nutzer in dieser Anwendung oder in anderen Anwendungen Zugriff haben. So kann unter anderem auch definiert werden, dass ein Mitarbeiter mit weniger Rechten ein zusätzliches Menü sehen kann, ohne ihn in eine höhere Rechtegruppe zuzulassen. Beispielsweise kann man festlegen, dass die Benutzer in der Gruppe “User: Alle Dokumente” zusätzlich Zugriff auf das Menü Berichtswesen im Verkauf erhalten, aber nicht auf die Konfigurationen, wie es der Administrator hat. Wichtig dabei ist ebenfalls die Registerkarten 7 und 8 zu beachten.
6. Ansichten:
Diese Ansichten (views) können die Nutzer sehen.
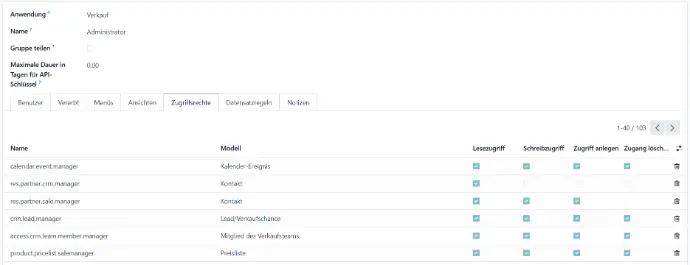
7. Zugriffsrechte:
In dieser Registerkarte werden die Zugriffsrechte auf Modellebene definiert. Dabei wird unterschieden, ob der Benutzer Lese-, Schreib-, Objekt-erzeugen- und Löschrecht für das jeweilige Objekt hat.
8. Datensatzregeln:
Hier wird in einer zusätzlichen Ebene definiert, auf welche Datensätze die Gruppenmitglieder Zugriff haben, ebenfalls mit der Unterscheidung Lese-, Schreib-, Objekt-erzeugen- und Löschrecht des jeweiligen Datensatzes. Die Angabe der Domain definiert dabei, wann der Benutzer das Recht hat, diesen Datensatz zu sehen und/oder zu bearbeiten.
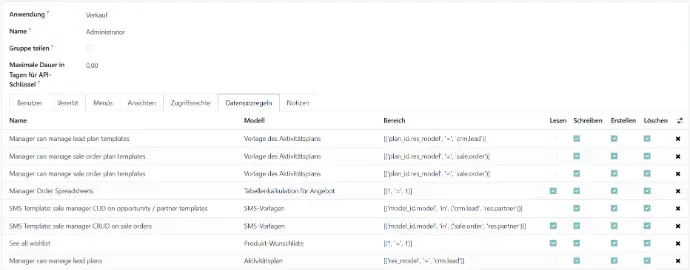
9. Notizen:
Hier stehen die Definition der Gruppe und weitere Informationen im Klartext.
Weitere Einstellungen und Übersichten
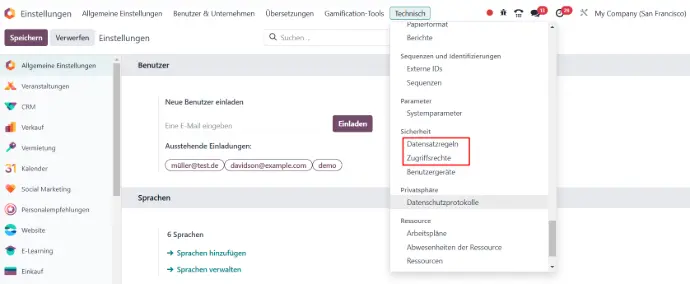
Alle oben genannten Zugriffsrechte und Rechte für Daten sind im Menü “Technisch” unter “Sicherheit” zu finden.
Hier sind alle Zugriffsrechte auf Modellebene inklusive ihrer zugehörigen Gruppe aufgeführt sowie alle Zugriffsrechte auf die Datensätze des jeweiligen Modells, inklusive der ggf. definierten Gruppen. Ist in dem Datensatz keine Gruppe definiert, so ist diese Gruppe global und gilt für alle Nutzer.
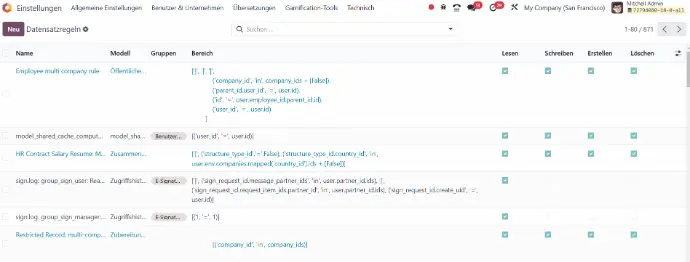
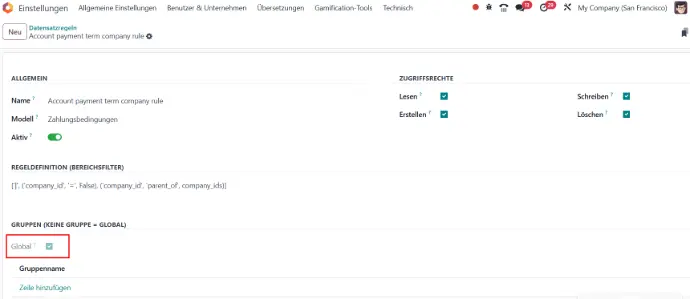
Auch in diesen beiden Menüs lassen sich weitere Zugangsberechtigungen definieren und neu anlegen.
Die Einstellungen der Rechte in Odoo ist ein komplexes Thema und kann hier in diesem Artikel nur oberflächlich behandelt werden. Wir bitten daher stets zu beachten, dass eine Umkonfiguration einen erheblichen Einfluss auf die Datenbank haben kann. Wir empfehlen daher unbedingt, mit einem unserer Experten Kontakt aufzunehmen zum Sicherstellen der korrekten Konfigurationen jeglicher Zugriffsrechte im Unternehmen.
Quellen: www.odoo.com, www.odootricks.tips
Zugriffsrechte in Odoo