In vergangenen Blogbeiträgen berichteten wir bereits über die Kommunikation in Odoo und über die Einrichtung Catch-all-E-Mail. In diesem Artikel soll es speziell um die Einrichtung einer IMAP Verbindung gehen, indem auch eine Zwei-Faktor-Authentifizierung berücksichtigt wird. Nur so ist es möglich, E-Mails über IMAP abzuholen.
Damit Odoo Mails von Office 365 via OAuth2 abholen kann, ist es notwendig, die dafür bereitgestellte App zu installieren. Wir gehen dazu in die App-Übersicht von Odoo und löschen als erstes das Suchwort "Apps" aus der Suche. Stattdessen wird nach Fetchmail gesucht.
Fetchmal Outlook App installieren
Nun müssen Sie die App "Fetchmail Outlook" installieren.
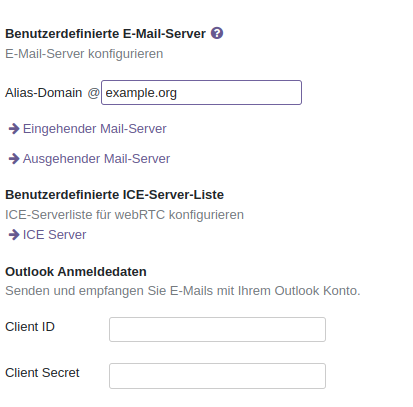
Hat die Installation funktioniert, wird eine neuer Bereich “Outlook Anmeldedaten” in den Allgemeinen Einstellungen unter Benutzerdefinierte E-Mailserver angezeigt.

Die Daten für die zwei neuen Datenfelder Client ID und Client Secret bekommen wir, indem wir im Azure Active Directory Center eine App für den Odoo-Client registrieren.
App-Registrierung im Azure Active Directory Admin Center
Um Odoo die Möglichkeit zu geben, E-Mails via IMAP und OAuth2 abzuholen, gibt es mehrere Wege. Es ist auch möglich, E-Mails von einer “Shared Mailbox” oder ohne zusätzliche Freigabe von dem Postfach abzuholen. Die hier beschriebene Methode verwendet die delegierte Berechtigung, bei der keine Zustimmung eines Administrators nötig ist. Es genügt das Anmelden an das zu verwendende Outlook Konto, wodurch die Berechtigung gewährt wird.
Im Menü des “Azure Active Directory Admin Center” wählen wir “Azure Active
Directory” und im neu erscheinenden Menü wählen wir “App-Registrierung”. Hier finden Sie oben links die Möglichkeit, eine neue
App zu registrieren. Zum Beispiel:
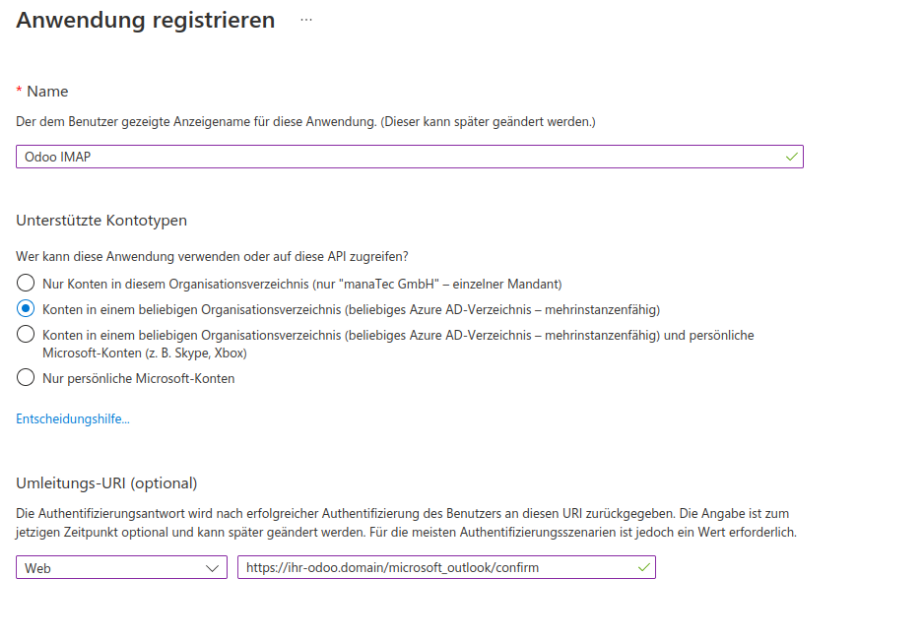
Nun wählen wir den Kontotyp “Konto in einem beliebigen Organisationsverzeichnis"
und setzen eine Umleitungs-URL vom Typ Web, die sich aus ihrer
Odoo Domain gefolgt von /microsoft_outlook/confirm zusammensetzt. Dabei
ist zu beachten, dass diese über ein gültiges Zertifikat verfügt. Ohne
ein Zertifikat ist nur http://localhost als möglicher Wert für die
Domain erlaubt und kann damit nicht auf einem externen Server verwendet
werden. Nachdem wir diese mit dem Button "Registrieren" angelegt haben,
befinden wir uns als Erstes in der Übersicht der neuen Anwendung
(App). Hier finden wir bereits die neu erstellte Anwendungs-ID
(Client-ID)

Diese wird dann für die Outlook Anmeldedaten “Client ID” in Odoo benötigt. Auch ist es möglich, direkt in der Übersicht auf die Clientanmeldeinformationen zu klicken, um ein Geheimnis für die Anmeldung zu erstellen. Die gleiche Option wird gegeben, wenn wir im linken Menü auf “Zertifikate & Geheimnisse” klicken.
Dort erstellen wir einen neuen geheimen Clientschlüssel und geben dessen Laufzeit an. Dazu gibt es einen vorgegebenen Zeitraum z. B. sechs Monate oder wir erstellen manuell einen eigenen Zeitraum der Gültigkeit. Wichtig ist, das Ende des Zeitraums im Blick zu behalten. Mehr dazu am Ende in den allgemeinen Informationen.
Wenn wir auf Hinzufügen geklickt haben, wird uns der Clientschlüssel angezeigt. Dabei ist es wichtig, jetzt den “Wert”
des Client-Schlüssels zu kopieren. Dazu finden wir neben dem Wert das
Kopiersymbol zum Anklicken.

Verlassen Sie diese Übersicht ohne Kopieren des Schlüssels, ist dies anschließend nicht mehr möglich und Sie müssen den Clientschlüssel erneut erstellen. Dieser “Wert” wird dann im Odoo für die “Outlook Anmeldedaten” als “Client-Secret” benötigt.
Als
nächstes müssen noch die Berechtigungen für unsere neue App hinzugefügt
werden. Gehen Sie dazu im linken Menü auf “API-Berechtigungen”. Wenn
hier bereits voreingestellte Berechtigungen zugewiesen sind, löschen Sie
diese zuerst heraus. Danach können durch den Button "Berechtigung
hinzufügen" die benötigten Rechte hinzugefügt werden.

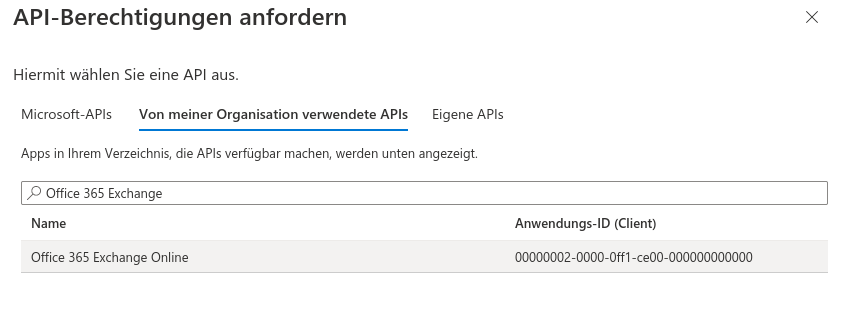
Wir gehen dazu auf den Reiter “Von meiner Organisation verwendende APIs" und
suchen nach “Office 365 Exchange”. Wenn wir dann “Office 365
Exchange Online” auswählen, werden wir aufgefordert, die Art der
Berechtigung zu wählen.
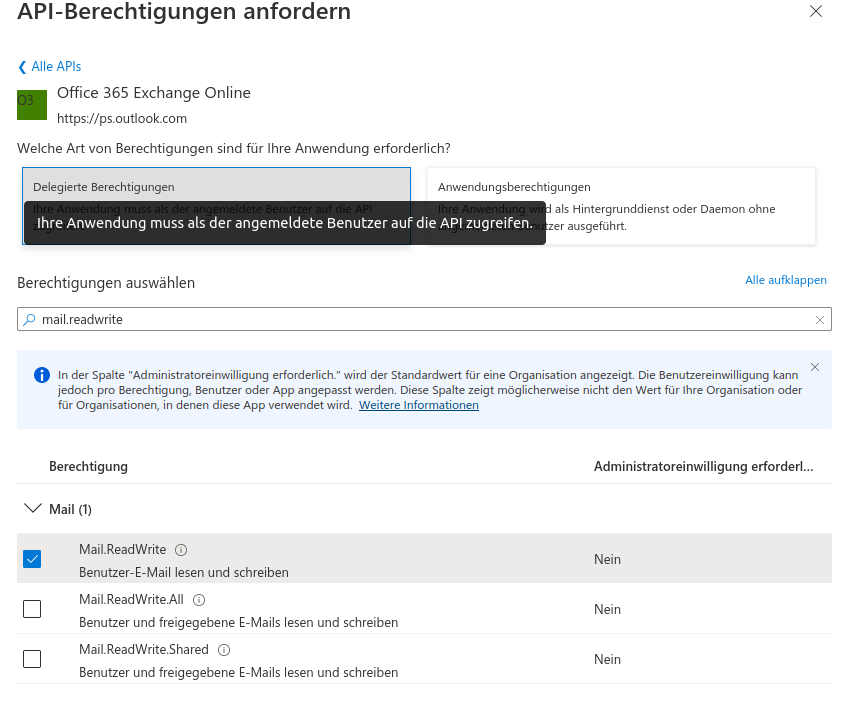
Wir wählen hier die
Art “Delegierte Berechtigung” und suchen dann nach “Mail.ReadWrite”.
Wenn wir die gefundene Berechtigung “Mail” sehen, klappen wir diese auf
und setzen den Haken bei dem Recht “Mail.ReadWrite”. Wenn wir das Recht
hinzugefügt haben, sollte das Ergebnis folgendermaßen aussehen. Das
Schreibrecht benötigt Odoo, damit dieses bereits abgeholte E-Mails auf
den Status “gelesen” setzen kann. Ein einfaches Leserecht genügt nicht.

Odoo IMAP Server Konfiguration
Wir tragen die vorher erstellten “Client ID” und “Client Secret” Informationen
in die Outlook-Anmeldeinformationen ein und speichern diese, wenn dies
nicht bereits geschehen ist.
Danach können wir “Eingehender Mail-Server” anlegen und konfigurieren.
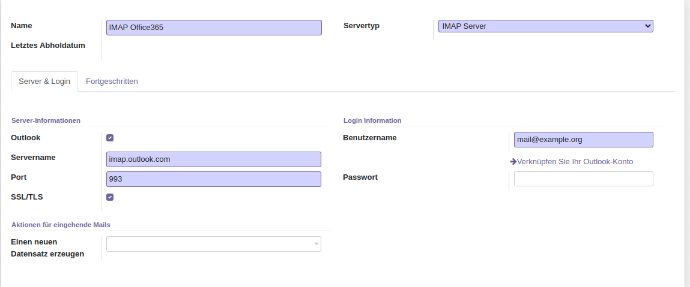
Dazu setzen wir als Erstes bei den Serverinformationen einen Haken bei Outlook. Die Werte wie Servername, Port und SSL/TLS werden dadurch bereits automatisch gesetzt. Wir fügen nur den “Namen” der Einstellung und den “Benutzernamen” des E-Mail-Kontos hinzu, von dem die E-Mails abgeholt werden sollen. Das Passwortfeld kann bei dieser Konfigurationsart leer bleiben. Wir klicken stattdessen auf “Verknüpfen Sie Ihr Outlook-Konto” unter dem Feld “Benutzername”. Dadurch werden wir auf die Office 365 Anmeldeseite weitergeleitet, bei der wir uns als das zu verwendende E-Mail-Konto anmelden und die Berechtigung für das Abholen der E-Mails final erteilen. Hat das funktioniert, sollte "Eingehender E-Mailserver" unter dem Benutzernamen in der Odookonfiguration stehen.

Um die Konfiguration abzuschließen, klicken wir nun auf “Testen & Bestätigen”.
Wenn alles richtig funktioniert hat, sollte rechts der Status auf "Bestätigt" wechseln. Damit ist nun Odoo befähigt, die OAuth2 Authentifizierung von Office 365 zu verwenden, um E-Mails via IMAP abzuholen.

Allgemeine Informationen
Wenn der geheime Clientschlüssel abgelaufen ist, wird Odoo keine E-Mails abholen können. Dies der Fall ist, steht nur in den Odoo Server Logs. Ein einfacher Weg herauszubekommen, ob der Clientschlüssel abgelaufen ist, wenn keine E-Mails im Odoo ankommen, ist es, in den Einstellungen des eingehenden Mail-Servers die Bestätigung zurückzusetzen und wieder versuchen, diesen zu bestätigen. Dadurch wird die genaue Fehlermeldung, wenn etwas nicht funktioniert , z.B. der Client-Schlüssel nicht mehr gültig ist, als Popup in der Odoo-GUI angezeigt. Wenn der Client Schlüssel abgelaufen ist, muss dieses “Geheimnis” im Azure-Active-Directory-Admin-Center neu angelegt werden und der neue Clientsecret in den Allgemeinen E-Mail Einstellungen neu hinterlegt werden. Danach können wir das E-Mail-Konto in den Einstellungen des ausgehenden Mail-Servers via “Testen und Bestätigen” wieder bestätigen.
Sie benötigen Hilfe beim Einrichten des Office-365-Client in Odoo, oder haben weitere Fragen zu dem Thema, dann kontaktieren Sie uns gerne, wir helfen Ihnen schnellstmöglich weiter!
Odoo eingehende Mailserver mit Office 365 OAuth2 Authentifizierung