Sprechen wir von der Digitalisierung innerhalb eines Unternehmens, stehen nicht nur die Unternehmensprozesse, sondern auch sämtliche Dokumente im Fokus. Häufig wird dafür der Begriff “papierloses Büro” verwendet. In unseren vergangenen Blogbeiträgen sind wir bereits auf einige Möglichkeiten eingegangen, wie wir unsere Prozesse im ERP-System Odoo abbilden können und hatten dabei stellenweise schon Berührungspunkte im Umgang mit Dokumenten in Odoo.
Dabei haben wir gelernt, dass Odoo generell objektbezogen arbeitet und an den einzelnen Objekten, zum Beispiel Kontakte oder Mitarbeiter, Dokumente hochgeladen werden können. Außerdem haben wir bereits erläutert, wie wir Dokumente aus Odoo heraus erzeugen können, zum Beispiel Ein- und Ausgangsrechnungen im Einkauf und Verkauf. In unserem heutigen Blog blicken wir weiterführend auf das Modul Dokumente, das Dokumentenmanagementsystem von Odoo, und die tollen Möglichkeiten, die uns Odoo damit zur Verarbeitung unserer Dokumente bietet.
Zur Nutzung des Moduls Dokumente stehen analog zu anderen Modulen drei Zugriffsrechte zur Verfügung. Hat ein Nutzer kein Zugriffsrecht, wird ihm das Modul im Dashboard nicht angezeigt und er hat keinen Zugriff. Die Nutzer der Gruppe “Benutzer” haben Zugriff auf die Dokumente und können diese lesen und be-/verarbeiten. Die Nutzer der Gruppe “Administrator” haben zusätzlich Zugriff auf die Konfiguration des Moduls.
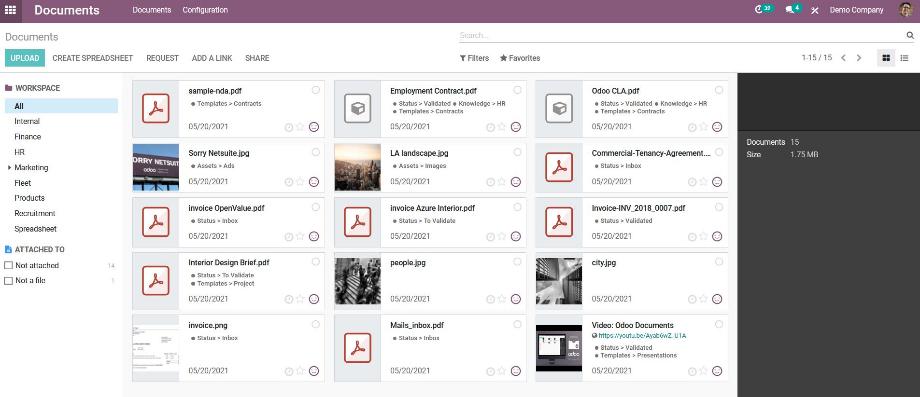
Öffnen wir das Modul Dokumente aus dem Dashboard, gelangen wir direkt zur Übersicht aller Dokumente. Das Menü innerhalb des Moduls besteht ausschließlich aus der Übersicht aller Dokumente und der Konfiguration. Die Möglichkeiten zu Suche, Filterung und Favoriten sowie zum Wechsel in die Listenansicht sind uns bereits aus Odoo bekannt. Zudem sehen wir verschiedene Buttons, mit denen wir Dokumente hochladen, anfordern oder teilen können. Die Hauptansicht ist unterteilt in drei Bereiche - die Kategorisierung der Dokumente nach Workspaces und Tags, die Dokumente selbst sowie einen grauen Bereich auf der rechten Seite, in dem uns nach Auswahl eines Dokumentes verschiedene Optionen ermöglicht werden.

Beginnen wir mit der Konfiguration des Moduls und navigieren dafür in die allgemeinen Einstellungen. Dort haben wir die Möglichkeit, Dokumente aus anderen Modulen im Modul Dokumente zu zentralisieren. Das heißt, alle Dokumente aus den ausgewählten Bereichen, zum Beispiel Personal oder Finanzen, werden auch zentral im Modul Dokumente in einem definierten Workspace abgelegt und können optional mit vorher definierten Tags versehen werden.
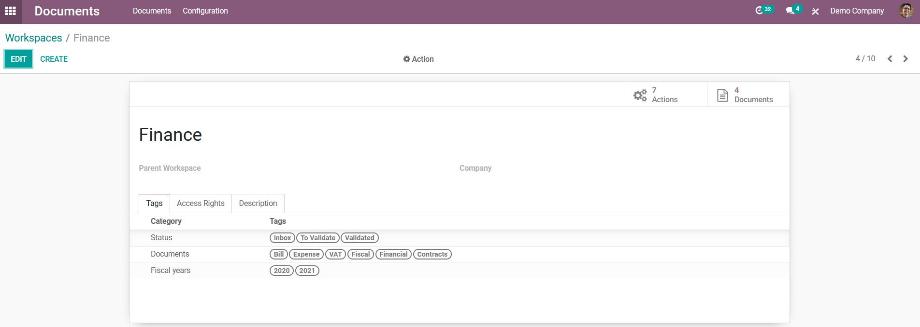
Im nächsten Schritt definieren wir die Workspaces, welche wir beispielsweise nach Abteilung oder Prozess anlegen. Innerhalb der Konfiguration eines Workspaces erstellen wir Kategorien und die dazugehörigen Tags. Damit kategorisieren, organisieren und strukturieren wir unsere Dokumente. Zudem können wir die Zugriffsrechte hinsichtlich Lesen und Schreiben der Dokumente in den einzelnen Workspace festlegen. Abschließend haben wir die Möglichkeit, eine Hierarchie für die Workspaces aufzubauen und diese in einer Multi-Company-Umgebung einem Unternehmen zuzuordnen.

In der Übersicht der Dokumente nutzen wir die Workspaces und Tags nun als Filter für die Dokumente. Per Drag & Drop lassen sich die Dokumente den Workspaces und Tags hinzufügen. Mit einem Klick auf das Icon eines Dokumentes öffnet sich dessen Vorschau. Hier wird deutlich, dass wir mit dem Modul Dokumente jegliche Dateiformate verarbeiten können, egal ob Textdateien, Bilder, Videos oder weitere. Klicken wir nun direkt auf ein Dokument, erscheinen, wie bereits oben erwähnt, in dem grauen Bereich auf der rechten Seite verschiedenen Bearbeitungsmöglichkeiten.
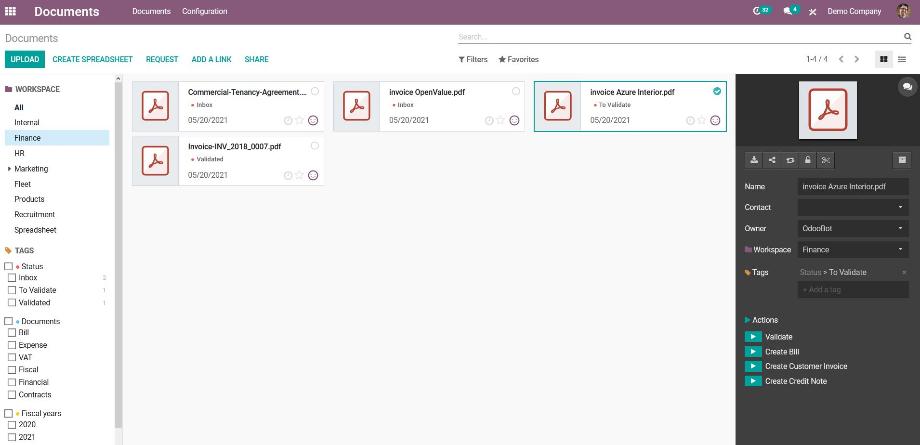
Auch hier lässt sich mit Klick auf das Icon des Dokumentes dessen Vorschau öffnen. Weiterhin können wir das Dokument herunterladen, teilen, durch eine aktuelle Version ersetzen, sperren oder archivieren. Das Sperren dient an dieser Stelle allerdings nur als Hinweis, dass bereits ein anderer User an dem Dokument arbeitet und damit keinen Schreibschutz. Archivierte Dokumente lassen sich über den entsprechenden Filter wieder aufrufen oder gegebenenfalls löschen.

Eine weiteres hilfreiches Feature ist das Aufteilen. Damit haben wir die Möglichkeit, mehrseitige Dokumente in einzelne Dokumente zu teilen und direkt im Modul Dokumente abzulegen. Mit einem Klick auf das Sprechblasen-Symbol öffnet sich der Chatter mit der Historie und den aus anderen Objekten bekannten Funktionen zur internen und externen Kommunikation sowie der Aktivitätenplanung. Abschließend können wir den Namen des Dokumentes bearbeiten, das Dokument einem Kontakt zuordnen und einem internen Nutzer zuweisen sowie die Workspaces und Tags anpassen.
Nun stellt sich die Frage, wie wir unsere Dokumente möglichst automatisiert in Odoo hineinbringen und dort effektiv weiterverarbeiten. Um die Dokumente ins Odoo zu bringen, nutzen wir E-Mail-Aliase. Die E-Mails-Aliase definieren wir innerhalb der Konfiguration der geteilten Links. Dort legen wir fest, welchem Workspace, welchen Tags und welchem Nutzer eine eingehende E-Mail als Dokument zugewiesen werden soll. Zudem können wir festlegen, dass dabei automatisch eine Aktivität eines bestimmten Typs für einen bestimmten Nutzer erzeugt wird. Damit stellen wir sicher, dass neu eingehende E-Mails beziehungsweise Dokumente erkannt und weiterverarbeitet werden können.
Die Weiterverarbeitung der Dokumente kann manuell erfolgen. Alternativ dazu können wir innerhalb der Konfiguration der Workspaces sogenannte Aktionen definieren. Diese Aktionen basieren auf der Zuordnung eines Workspaces sowie der Tags und lösen bestimmte Vorgänge aus. Dabei können wir festlegen, ob diese Aktion das Dokument einem anderen Kontakt oder einem anderen Nutzer zuweist, in einen anderen Workspace verschiebt, andere Tags vergibt oder ein anderes Objekt (Bewerber, Projektaufgabe, Produkt, Eingangsrechnung, Ausgangsrechnung, Gutschrift) in Odoo erzeugt. Zudem definieren wir, ob mit der Aktion nicht erledigte Aktivitäten als erledigt markiert werden und/oder eine neue Aktivität erzeugt wird.
Im folgenden Use Case verdeutlichen wir diese Vorgehensweise und betrachten den Workspace “Finanzen”. Für diesen Workspace definieren wir einen E-Mail-Alias, welchen wir für unsere Eingangsrechnungen nutzen. Unsere Lieferanten schicken uns all ihre Rechnungen an diesen E-Mail-Alias, wodurch die Eingangsrechnungen initial im Modul Dokumente im Workspace “Finanzen” landen. Mittels der Konfiguration des E-Mail-Alias wird beim Eingang einer neuen Rechnung eine Aktivität mit der Aufforderung zur Weiterverarbeitung für einen unserer Nutzer erzeugt. Durch die Konfiguration einer Aktion ermöglichen wir es, dass unser Nutzer aus dem Dokument heraus mit einem Klick eine Eingangsrechnung in Odoo erzeugt.

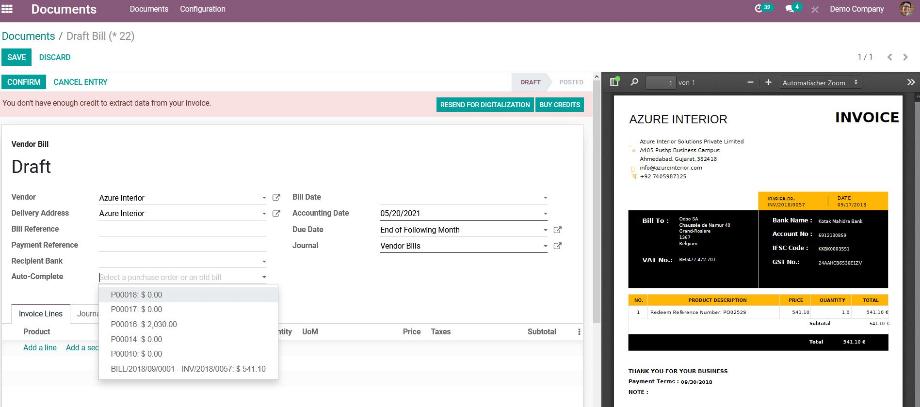
Dadurch springt der Nutzer direkt in das Modul Finanzen und befindet sich in der eben erzeugten Eingangsrechnung. Dort wählen wir den Lieferanten aus und nutzen das Feature der Autovervollständigung. In diesem Feld zeigt uns Odoo alle noch nicht bezahlten Einkäufe bei dem ausgewählten Lieferanten. Wählen wir einen dieser Einkäufe aus, werden automatisch alle Informationen des Einkaufs in die Eingangsrechnung übernommen. Anschließend bestätigen wir die Rechnung, überweisen den offenen Betrag und markieren die Rechnung als bezahlt. Alternativ bietet Odoo auch die Möglichkeit, das Dokument mittels OCR auszulesen und die Eingangsrechnung mittels dieser Informationen zu füllen. Dieses Feature ist allerdings kostenpflichtig und der Erwerb von Credits bei Odoo ist notwendig.
Wir halten also fest, dass sich das Modul Dokumente perfekt in die Struktur und Abläufe des ERP-Systems Odoo integriert. Mit dem Modul befindet sich auch unser Dokumentenmanagementsystem in Odoo und ist zudem von überall aus erreichbar. Durch die Nutzung der E-Mail-Aliase und der Aktionen stellen wir einen fließenden Workflow für unsere Dokumente sicher, welcher sich im Zusammenspiel mit anderen Modulen als sehr effektiv erweist. Damit erhöhen wir nicht nur unsere Produktivität, sondern sparen durch die digitalisierte Verarbeitung unserer Dokumente wichtige Ressourcen.
Ab Odoo-Version 14 wurde außerdem das Spreadsheet-Feature in das Modul Dokumente integriert. Wie das funktioniert, stellen wir in einem unserer nächsten Blogbeiträge vor.
Sie sind auf der Suche nach einem ERP-System, in dem Ihr Dokumentenmanagement vollständig integriert ist? Kein Problem! Kontaktieren Sie uns jetzt und wir stehen Ihnen als zuverlässiger Odoo-Partner zur Seite!
Quellen: www.odoo.com
Odoo 14 - Modul Dokumente