Nachdem wir uns in unserem letzten Blogbeitrag mit dem Modul E-Mail-Marketing beschäftigt haben, schauen wir uns nun an, inwieweit wir unsere Marketing- beziehungsweise Vertriebsaktivitäten in Odoo automatisieren können. Dafür bietet uns Odoo ein eigenes Modul, die Marketing-Automatisierung.
Ähnlich zum Modul E-Mail-Marketing stehen uns auch im Modul Marketing-Automatisierung zwei Zugriffsrechte zur Verfügung. Ein Nutzer ohne Zugriffsrecht hat keinen Zugriff auf das Modul, sieht das Modul also im Dashboard auch nicht. Die Nutzer der Gruppe "Benutzer" haben den vollständigen Zugriff auf das Modul, inklusive der Kampagnen und dem Berichtswesen.
Innerhalb des Moduls finden wir auch ausschließlich diese beiden Menüpunkte. Mittels der Kampagnen steuern wir die Automatisierung unserer Aktivitäten. Das Berichtswesen liefert uns aussagekräftige Kennzahlen zu unseren Aktivitäten beziehungsweise Kampagnen und stellt diese grafisch als Balken-, Linien oder Kuchendiagramm oder in einer Pivot-Ansicht dar. Die Kennzahlen stehen uns zusätzlich dazu auch in jeder einzelnen Kampagne zur Verfügung. Eine weiterführende Konfiguration oder optionale Features stehen uns an dieser Stelle nicht zur Verfügung.
Öffnen wir das Modul aus dem Dashboard heraus, gelangen wir direkt in die Übersicht unserer Kampagnen. Diese werden uns in einer Kanban-Ansicht angezeigt, wobei der Wechsel in die Listenansicht möglich ist. Innerhalb der Kanban-Ansicht stehen uns drei Stufen zur Verfügung. In der Stufe "Neu" befinden sich die Kampagnen, die wir noch bearbeiten. Alle Kampagnen, die wir gestartet haben, finden wir in der Stufe "Laufend". Alle beendeten Kampagnen finden wir in der Stufe "Gestoppt".

In der Übersicht der Kampagnen haben wir die Möglichkeit, neue Kampagnen anzulegen und bestehende Kampagnen zu bearbeiten beziehungsweise deren Workflow und die dazugehörigen KPIs einzusehen. Legen wir eine neue Kampagne an, definieren wir zuerst einen Namen und wählen das Datenmodell aus, auf welches sich unsere Kampagne bezieht. Diese Auswahl können wir durch die Nutzung von Filtern zusätzlich eingrenzen.

Nun beginnen wir mit dem Anlegen von Aktivitäten innerhalb unserer Kampagne. Dafür klicken wir auf den Button "Aktivität anlegen". Anschließend öffnet sich ein Pop-up, in dem wir neben dem Namen auch den Typ der Aktivität auswählen. Dabei haben wir die Auswahl zwischen E-Mail und Server-Aktion. Haben wir das Modul SMS Marketing installiert, steht uns zusätzlich der Aktivitätstyp SMS zur Verfügung.
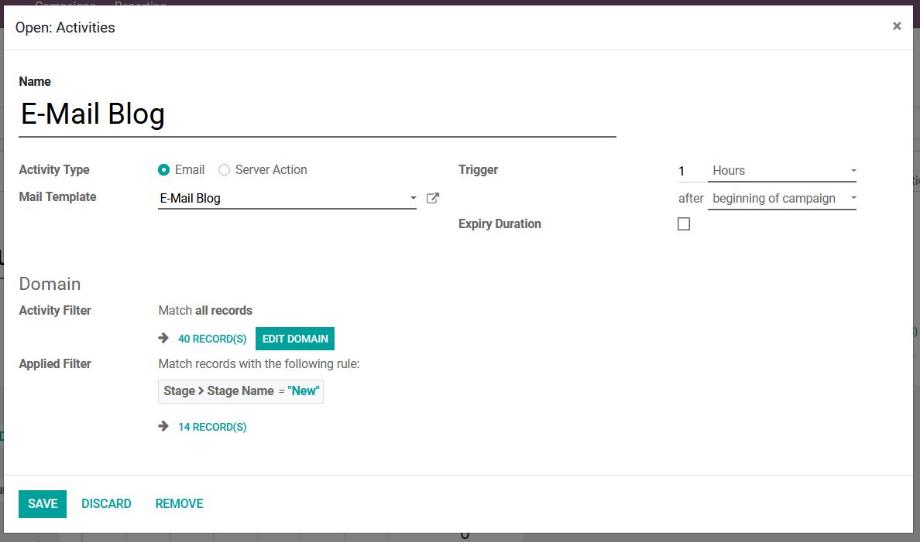
Für die E-Mail wählen wir eine E-Mail-Vorlage aus. Abschließend definieren wir den Auslöser für das Versenden der E-Mail. Die verfügbaren Zeiteinheiten sind Stunden, Wochen, Tage und Monate. Der Auslöser selbst kann beispielsweise der Beginn der Kampagne oder eine erledigte Aktivität sein. In der folgenden Abbildung sehen wir also, dass die E-Mail eine Stunde nach Beginn der Kampagne gesendet wird. Mithilfe der Definition einer Ablaufdauer können wir den Auslöser zeitlich begrenzen. Zusätzlich zeigt uns Odoo noch den vorher definierten Filter auf das Datenmodell an.

Nun legen wir eine weitere Aktivität an. Diese kann unabhängig von der ersten Aktivität ausgelöst werden. Viel hilfreicher ist allerdings der Aufbau von Aktivitäts-Ketten. Damit bauen die Aktivitäten in Abhängigkeit von vorher definierten Bedingungen aufeinander auf. Am Beispiel der oben erstellten E-Mail können wir die Folgeaktivität auslösen, nachdem die E-Mail gesendet oder in einem bestimmten Zeitraum geöffnet, nicht geöffnet, beantwortet, nicht beantwortet, geklickt, nicht geklickt oder verworfen wurde.
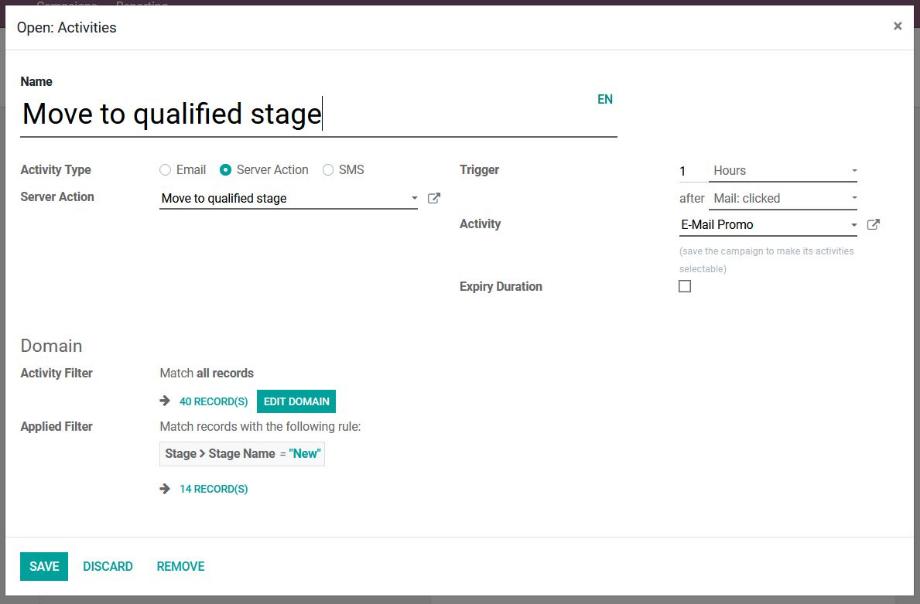
Zur Erstellung der Folgeaktivität öffnet sich wieder ein Pop-up, in dem wir erneut den Namen und den Typ der Aktivität auswählen. Mithilfe der Server-Aktion haben wir unzählige Möglichkeiten, zum Beispiel die Erstellung einer Aktivität, das Verschieben eines Objektes in eine andere Stufe, das Versenden von Nachrichten an interne Nutzer oder das Anlegen eines neuen Objektes. Abschließend definieren wir den oben beschriebenen Auslöser. In der folgenden Abbildung sehen wir, dass die Server-Aktion ausgelöst wird, wenn der Empfänger der vorherigen E-Mail einen Link innerhalb der E-Mail geklickt hat. Die zeitliche Begrenzung des Auslösers sowie die Anzeige der Filter auf das Datenmodell stehen uns selbstverständlich auch hier zur Verfügung.

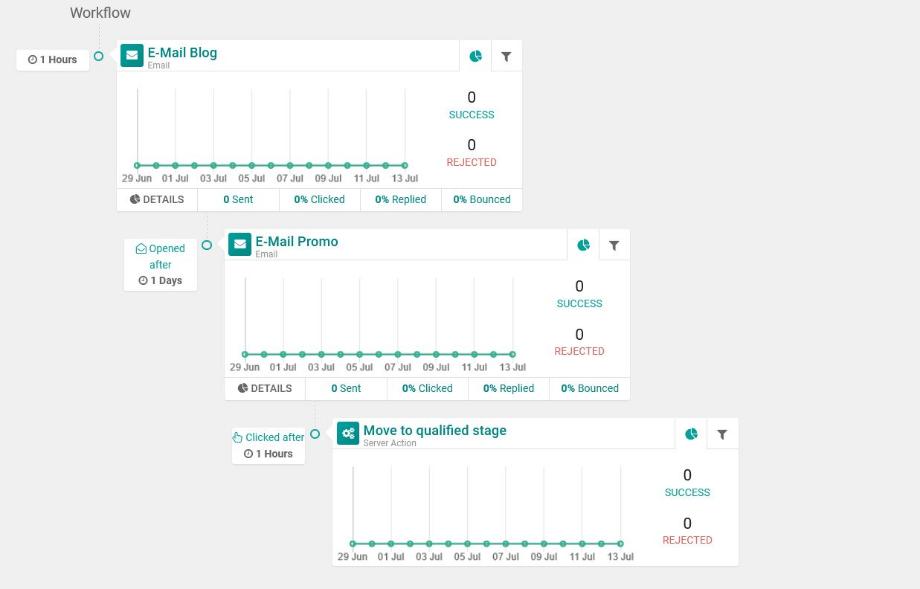
Haben wir alle Aktivitäten und Folgeaktivitäten erzeugt, speichern wir unsere Angaben und Odoo stellt uns den Workflow inklusive der Kennzahlen zu den einzelnen Aktivitäten dar. Hier sehen wir genau, welche Aktivität wann ausgelöst wird und wie erfolgreich unsere Aktivitäten innerhalb der Kampagne waren. Mit dem Button "Einen Test starten" haben wir die Möglichkeit, unsere Kampagne anhand eines Beispiel-Datensatzes zu testen. Ist der Test erfolgreich, starten wir unsere Kampagne mit Klick auf den Button "Start".

Damit wird die Kampagne in die Stufe "Laufend" geschoben und die einzelnen Aktivitäten werden anhand der Auslöser vollständig automatisiert durchgeführt. Laut der oben gezeigten Abbildung ergibt sich folgender Workflow für das Objekt Verkaufschance im Modul Kundenverwaltung (CRM): Eine Stunde nach Beginn der Kampagne sendet Odoo automatisch eine E-Mail an alle Kunden, deren Verkaufschance sich in der Stufe "Neu" befindet. Einen Tag nach dem Versenden der ersten E-Mail, sendet Odoo wieder automatisch eine weitere E-Mail an alle Kunden, die die erste E-Mail geöffnet haben. Eine Stunde nach dem Versenden der zweiten E-Mail, werden all die Verkaufschancen automatisch in die Stufe "Qualifiziert" geschoben, deren Kunden einen Link innerhalb der zweiten E-Mail geklickt haben.
Dieser Workflow lässt sich beliebig erweitern, dabei sind uns keine Grenzen gesetzt. Denkbar wäre an der Stelle, dass nach dem Verschieben der Verkaufschance in die Stufe "Qualifiziert" auch eine Aktivität für den Verkäufer mit der Aufforderung zum Versenden eines Angebotes erstellt wird.
Mithilfe der Smart Buttons bietet uns Odoo innerhalb der Kampagne außerdem eigene Ansichten für die verwendeten E-Mail-Vorlagen, versendete SMS, Anzahl der Klicks in den E-Mails, durchgeführte Tests sowie den Teilnehmern beziehungsweise Empfängern der einzelnen Aktivitäten. Vor allem der zuletzt genannte Link ist hilfreich, da wir damit in die Auswertung der Kennzahlen für jeden einzelnen Teilnehmer beziehungsweise Empfänger gelangen und die Aktivitäten dort bei Bedarf mit Klick auf den Start-Button auch manuell auslösen können.

Die Aktivitäten unserer Kampagnen werden so lange durchgeführt, bis wir die Kampagne mittels Klick auf den Button "Stopp" beenden. Dadurch wird die Kampagne in die Stufe "Gestoppt" geschoben.
Wir halten fest, dass uns Odoo mit dem Modul Marketing-Automatisierung eine tolle Möglichkeit bietet, um unsere Marketing- beziehungsweise Vertriebsaktivitäten zu automatisieren und zu steuern. Dabei empfiehlt sich nicht nur ein Einsatz mit Bezug auf die Kontakte oder die Kundenverwaltung (CRM).
Durch die Auswahl eines beliebigen Datenmodells für die Kampagnen und vor allem die Ausführung von Server-Aktionen sind zahlreiche Anwendungsmöglichkeiten denkbar. Damit lassen sich beispielsweise auch die Workflows in den Bereichen Recruiting, Personalmanagement, Kundendienst, Projektmanagement, Einkauf, Verkauf, E-Commerce oder Accounting automatisieren und nachverfolgen.
Sie sind auf der Suche nach einem ERP-System, mit dem Sie Ihre Marketing- und Vertriebsmaßnahmen automatisieren können oder haben Fragen zum Modul Marketing-Automatisierung? Kein Problem! Kontaktieren Sie uns jetzt und wir stehen Ihnen als erfahrener und zuverlässiger Odoo-Partner zur Seite!
Quellen: www.odoo.com
Odoo 14 - Modul Marketing-Automatisierung