Digitalization has brought about an impressive transformation in the business landscape in recent years, and enterprise software integration plays a crucial role in this. Odoo, a comprehensive enterprise management platform, has proven to be a powerful tool to fulfill various business needs. In this guide, we will focus on one specific aspect, namely configuring the inbound and outbound mail server in Odoo using Google Workspace's (formerly G Suite) advanced OAuth2 authentication.
Email is still an indispensable part of business communication. The integration of GMail as an inbound or outbound mail server in Odoo offers not only efficiency but also security through the use of OAuth2 authentication. This method replaces traditional passwords with a more secure method, increasing the security level of your business communications.
In the following sections, we will guide you in detail through the process of setting up the two mail servers in Odoo with GMail OAuth2 authentication. Here we need to follow the steps carefully to ensure a smooth integration and enjoy the benefits of secure and efficient email communication in your Odoo system.
Step 1: Create Google project
To get started, we visit the Google API platform. To do this, we need to log in with a Google Workspace Admin account of the organization.
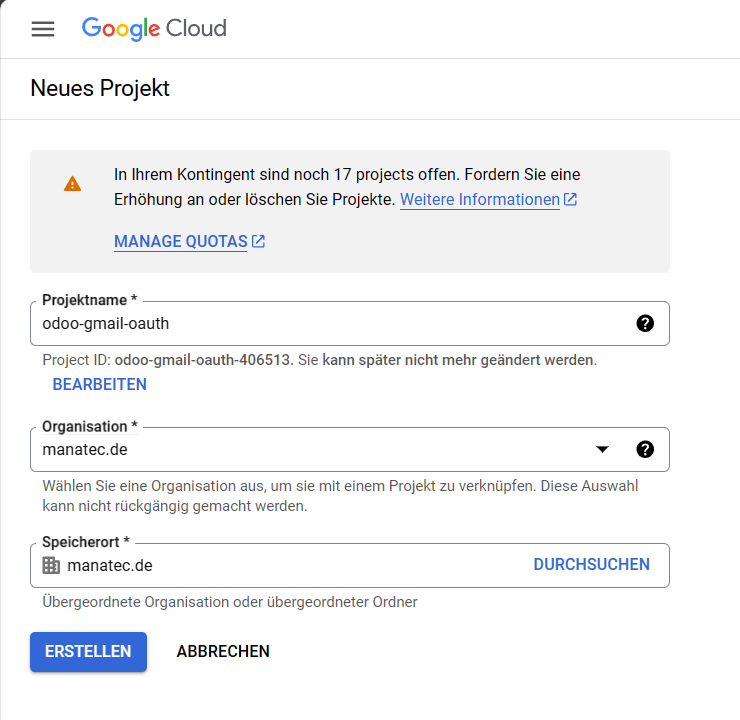
To get started with the OAuth2 configuration, we need to create a new project. The "Create project" option is located on the far right of the OAuth consent screen. If a project has already been created in this account, the "New Project" option will be located at the top left under the "Select Project" dropdown menu.
On the new project screen, we name the project with a unique name so that we can better assign the connection later on. The respective domain should be selected in the organization and storage location area.
Step 2: Configure consent screen
This step is crucial to generate the required authentication information needed for the secure connection between Odoo and your GMail account. In the following sections, we will explain in detail how to integrate this information into Odoo and make communication between the platforms seamless.
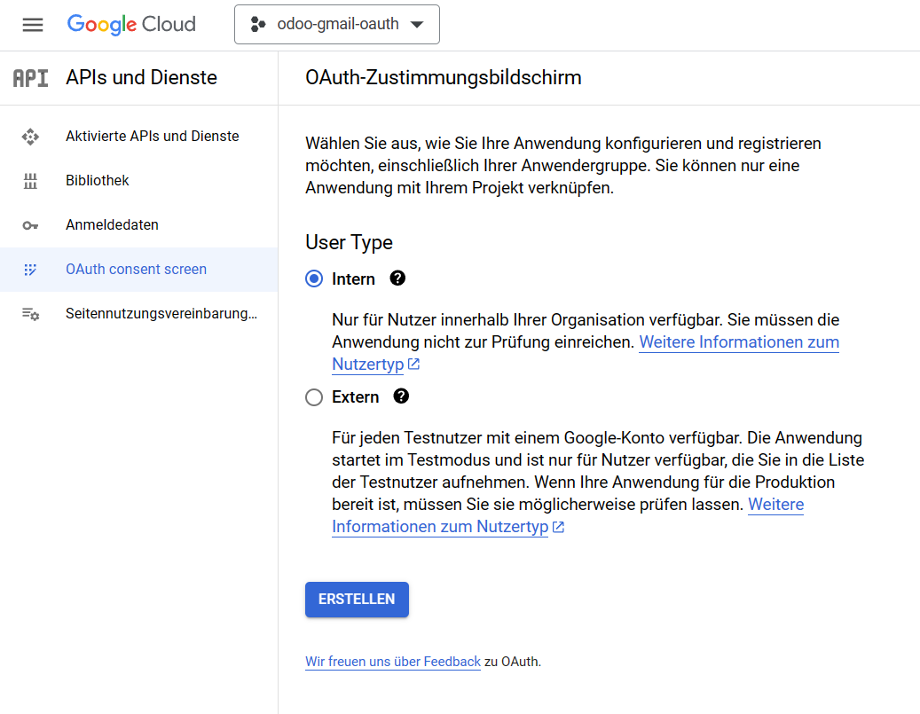
To do this, we click on Create to complete this step. On the next screen, we select the "Internal" option for "User type" and click "Create" again to go to the "Edit app registration" page.
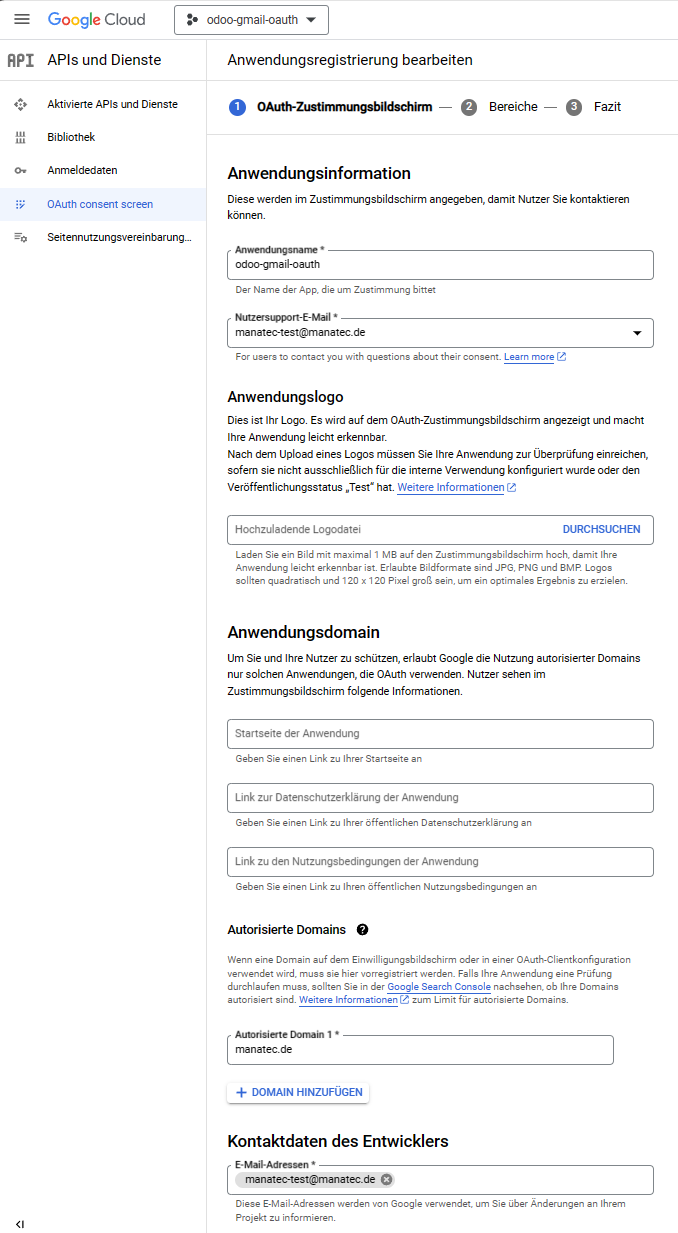
In the step of the OAuth consent screen under the "App information" section, we enter a unique name in the "App name" field, which will be displayed later during the OAuth2 login. Here we enter the organization's email address in the "Email address for user support" field.
Next, we click on "Add domain" under "App domain → Authorized domains" and enter the domain of the organization, e.g. manatec.de” .
Then, in the "Developer contact information" section, we enter the organization's email address. Google will use this email address to notify the organization of any changes to your project.
We then click on "Save and continue".
Finally, we scroll down and click on "Back to dashboard". These steps are essential to complete the app registration for OAuth2 authentication and ensure a smooth integration between Odoo and your GMail account. In the next sections, we will continue the configuration in Odoo to complete the connection.
Step 3: Create Oauth2 login data
Now that we have set up the project, we need to create the credentials, which include the client ID and the client secret. To do this, we first click on "Login data" in the menu on the left-hand side.
Then we click on "Create credentials" in the top menu and select "OAuth client ID" from the drop-down menu.

We select "Web application" as the "Application type" in the drop-down menu.
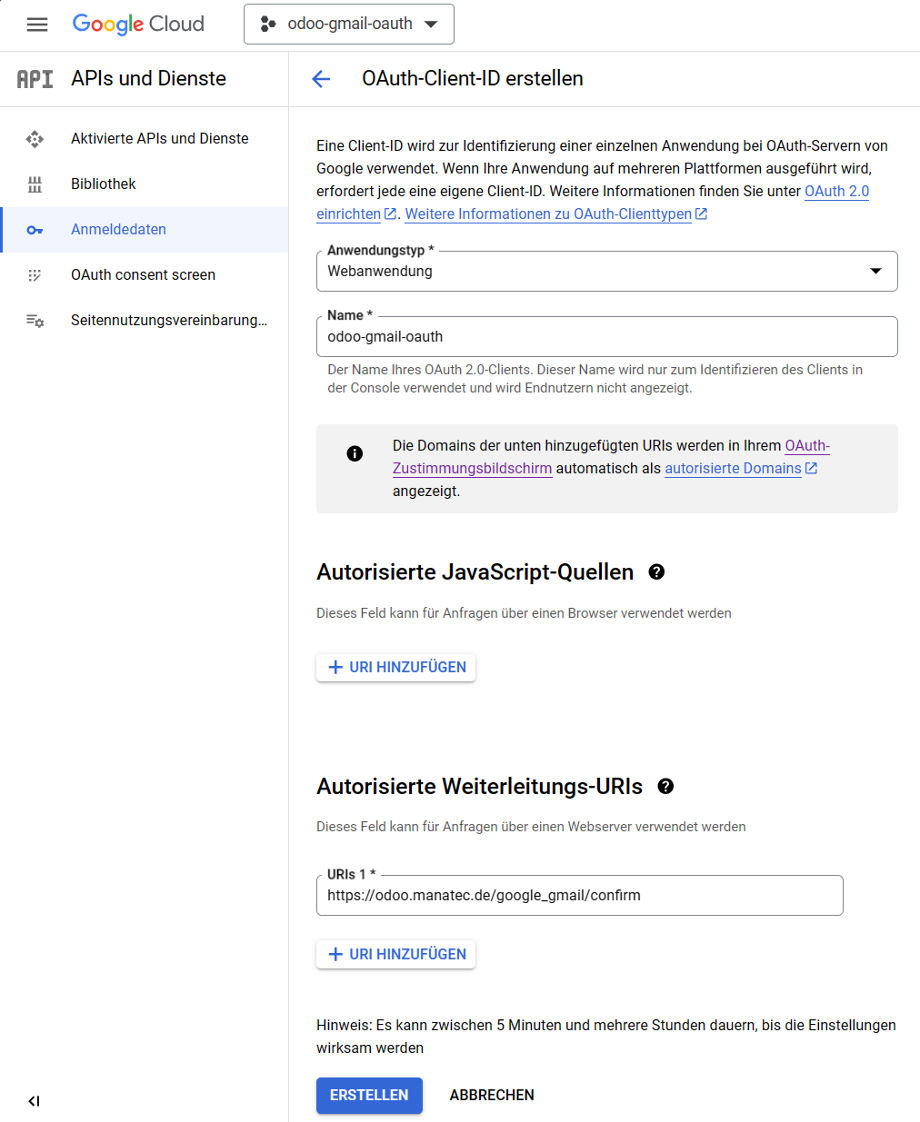
For the name of the login data, we also enter a unique but suitable name so that we can assign it more easily later on.
Under "Authorized redirect URIs", we click on the "Add URI" button and then enter https://meinerp.meinedomain.de/google_gmail/confirm in the URIs 1 field. Here we must ensure that we enter the correct URL of the Odoo system so that the subsequent redirect works properly.
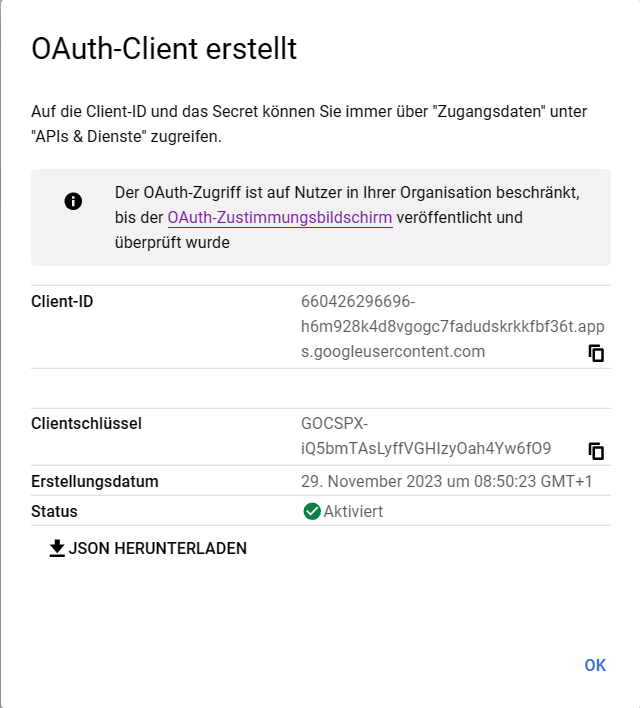
Finally, we click on "Create" to generate an OAuth client ID and a client secret. It is recommended to store the data in a password manager, such as Psono.
Step 4: Install Odoo module
Next, we need to install the Odoo module "Google GMail". This crucial module is available as standard from Odoo version 13 CE and forms the basis for the seamless integration of GMail as an incoming and outgoing mail server.
To install the module, we first navigate to the Odoo dashboard and switch to the app area. Here you can search for the existing module and install "Google GMail".
Step 5: Set client login data in Odoo
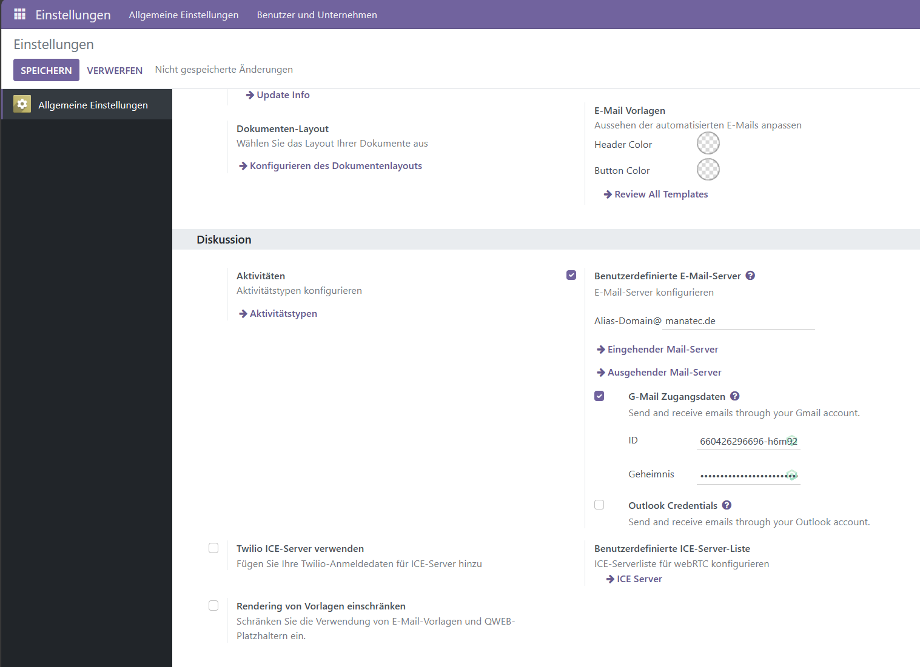
Now we navigate to "Settings → General settings" and make sure that the checkbox for "Custom email servers" is activated in the "Discussion" section. This will display a new option for the Gmail credentials. Here, the Client ID and Client Secret must be entered in the appropriate fields. To complete the process, we need to save the settings.
Step 6: Configure incoming mail server
The corresponding incoming mail server can now be set up using the previously set login data.
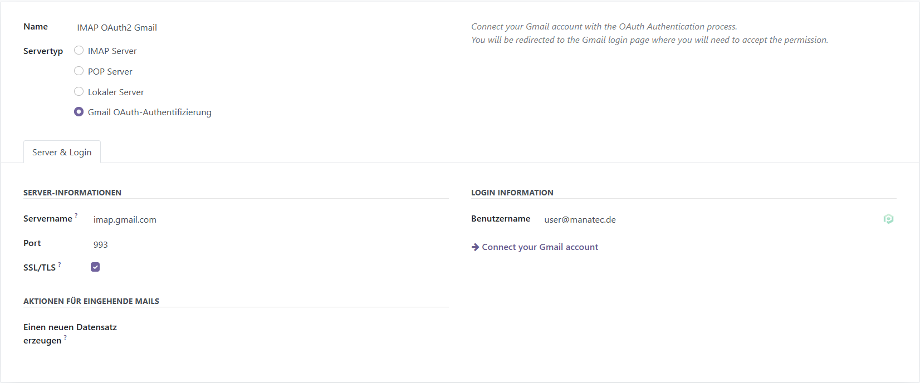
To do this, we create a new incoming mail server and assign a suitable name, e.g. "IMAP GMail OAuth2". We specify the Google IMAP server as the server name "imap.google.com”, as port "993", activate SSL/TLS and enter the corresponding account, e.g. catchall@domain.de as the user name. To start signing in to Google via OAuth2, we need to click on the "Connect your Gmail account" button.
A new Google window opens to complete the authorization process. To do this, we select the corresponding email account to be configured in Odoo.
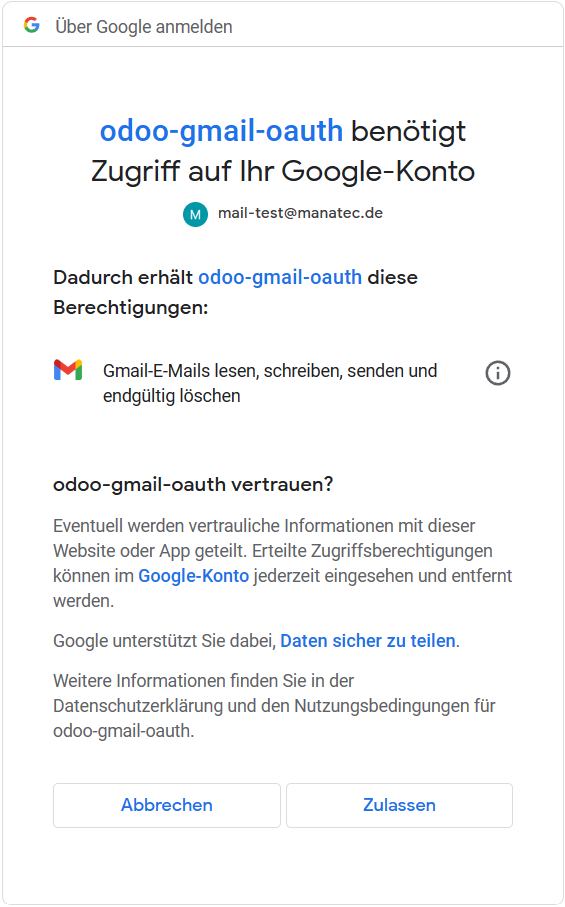
Now we have to allow Odoo to access the Google account by clicking on "Allow". The page then navigates back to the newly configured outgoing email server in Odoo. The configuration automatically loads the token in Odoo and a green tag appears with the inscription "Gmail token valid".
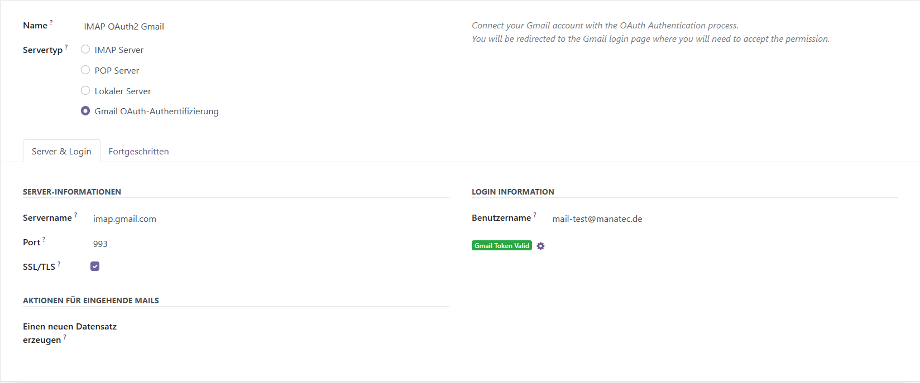
Finally, we save the settings and test the connection. A confirmation message should be displayed. The Odoo system can now receive secure and protected emails via Google by using OAuth2 authentication.
Step 7: Configuring the outgoing mail server
Choosing the right method for connecting an SMTP server in Odoo is crucial for smooth and secure email communication. In this section, we look at two options Odoo users have to optimize their email functionalities.
Option 1: Connection via OAuth2
The first option for connecting an SMTP server in Odoo is via the advanced OAuth2 authentication. The integration with Google Gmail (Google Workspace) ensures secure and efficient communication. Once we have installed the appropriate Odoo module and configured the Google credentials, we can set up an outgoing email server that uses OAuth2 authentication. This approach not only provides increased security by eliminating the need for traditional passwords, but also enables a seamless connection between Odoo and your G-Mail account.
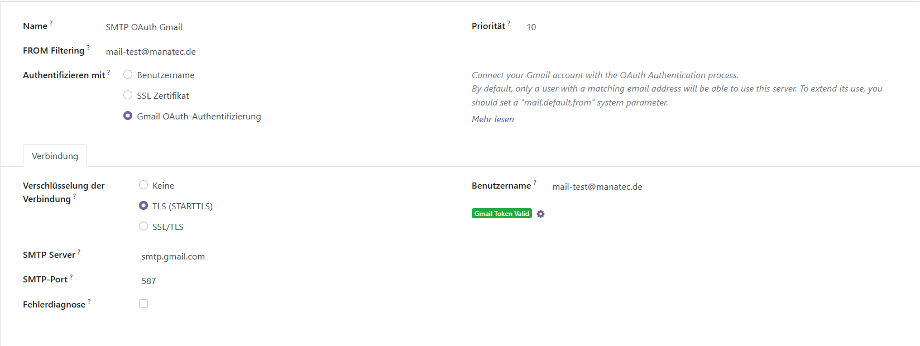
Option 2: Sending via SMTP Relay
The second option for connecting an SMTP server in Odoo is sending via SMTP relay. This method makes it possible to send emails via an external SMTP server without having to store the specific login data of the target server in Odoo. All you have to do is enter the relevant SMTP server information such as host, port and, if necessary, the encryption options. This is particularly useful if an existing SMTP server or a third-party service is already available and the emails can be sent via this relay server. The setup is comparatively simple and usually does not require any further authentication steps as with OAuth2. As the SMTP server, we create the correct server "smtp-relay.gmail.com”, port 25 and TLS as the encryption. It is not necessary to enter user data here.
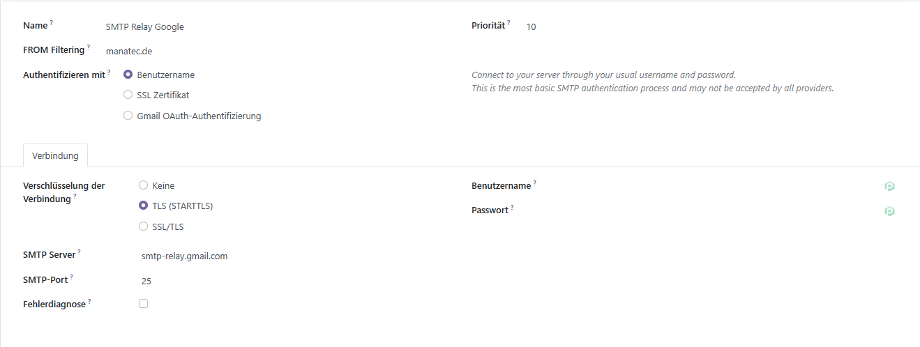
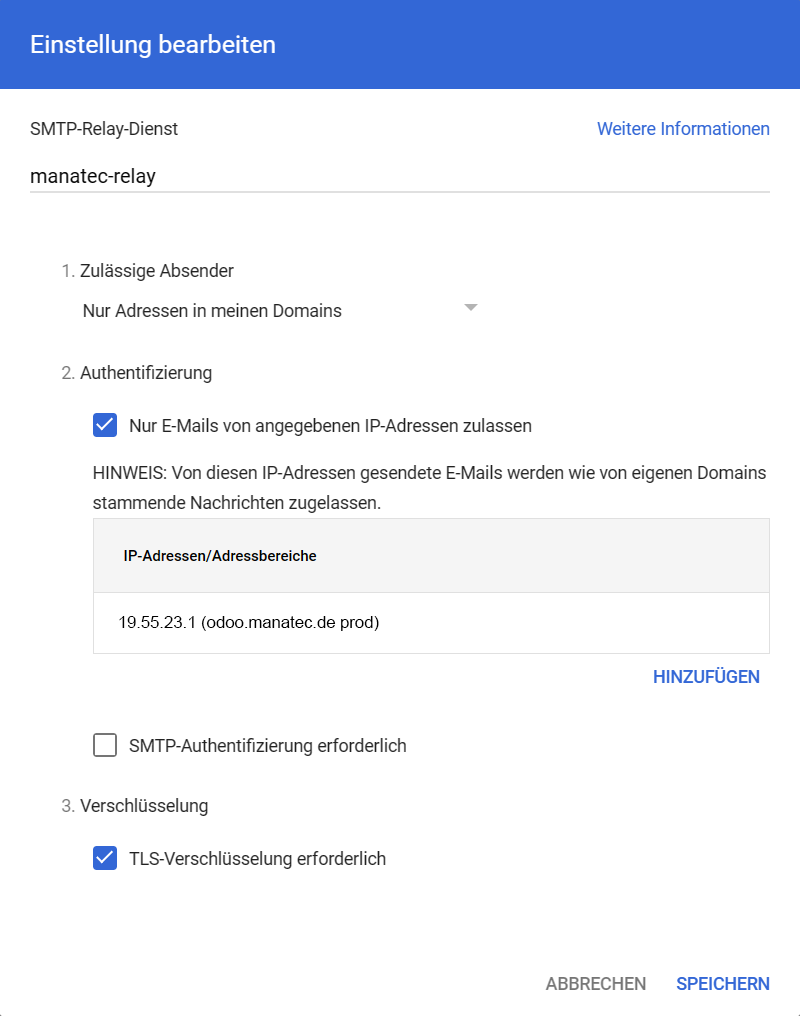
In order to allow Google to send emails, it is necessary to store the IP address of the Odoo system in Google Workspace. The setting can be found under the following menu item
Google Workspace → Apps → Google Wordspace → Gmail → Routing → SMTP relay service
Another rule must be added here so that Odoo can send e-mails via the SMTP relay service.
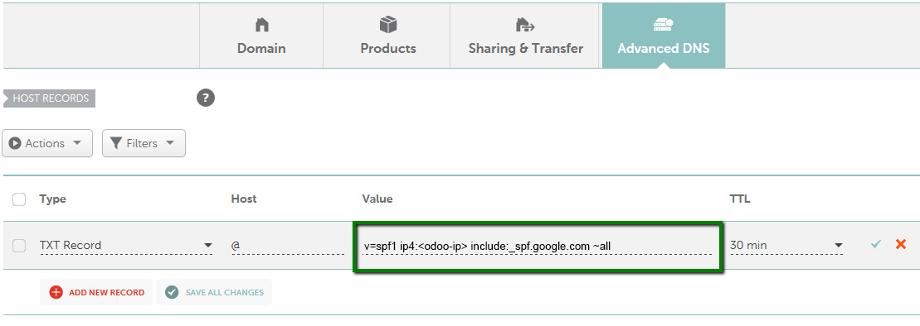
To avoid emails from Odoo being marked as spam by the recipient, the appropriate SPF record must be set in the DNS administration of the sending domain. In our example, we use namecheap. The SPF record should look like this:
v=spf1 ip4:<odoo-ip> include:_spf.google.com ~all
The configuration of OAuth2 quickly becomes a complex topic in Odoo and can only be dealt with in general terms in this article. We will of course support you in setting up the mail server correctly in Odoo. Feel free to contact us.
Sources: www.odoo.com, meinerp.meinedomain.de, imap.google.com